Boss Waves in Build a Dino Defense
Named stampede bosses from Trike Titan to Scytheclaw and Boulderback — prep that keeps Egg HP alive.
Why bosses change the run
Normal waves teach your funnel. Boss waves punish it. In Build a Dino Defense on Roblox (Big Chomp Games), named encounters show up in badges and community footage: Trike Titan, Gravemaw, Chompers, Titanhorn, Scytheclaw, and Boulderback. Exact spawn timing can shift with patches, but the survival pattern stays consistent: stack damage on the forced lane, freeze panic spending, and never leave a side gap into the egg.
Naming honesty: Trike Titan is badge-confirmed (official Roblox badge for toppling it). Other boss labels on this page are community-named from footage — useful for callouts, not invented patch-note HP sheets. Official badge detail: Badges Guide.
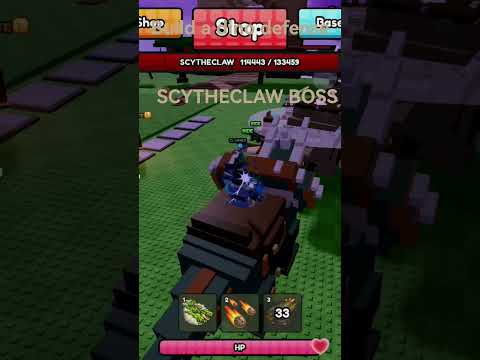
This guide pairs with How to Defend the Egg, Traps and Turrets, Walls and Lanes, Common Mistakes, and the Fort Prep Checklist. The embedded video covers a clear Scytheclaw community fight — watch placement discipline, then rebuild between waves instead of mid-fight.
Confirmed progression signals
- Badge Compy Tamer — survive your first wave (learning the egg fail state). See Badges.
- Badge Trike Titan — topple the Trike Titan (first major badge-confirmed named check).
- Wave counter in the HUD — treat rising wave numbers as a timer to finish upgrades before the next boss window.
- Shop tabs commonly observed in gameplay: Walls, Traps, Turrets, Weapons.
- Community boss shorts — Scytheclaw clears and Boulderback fight clips that document named pressure even before formal patch essays exist.
If another boss name appears after an update, treat it like a denser tank pack: more DPS on the same choke, not a wider decorative maze. Track observations on the Changelog Tracker without inventing version numbers.
Universal boss prep (do this every time)
- Seal the egg. Walk the perimeter. One forgotten corner ends more runs than low DPS.
- Force one lane. Bosses that path through stacked traps melt; bosses that split around empty walls eat Egg HP.
- Upgrade hot tiles first. Put cash into the traps and turrets that already see traffic.
- Keep a cash buffer. Bosses often bring follow-up packs; zeroing out for cosmetics is how eggs die next wave.
- Equip a weapon from crates. Personal DPS cleans leaks while turrets stay locked on the boss body.
- Stop building mid-boss. Placement misclicks open gaps. Finish the fight, then rebuild.
Use the printable-style list on Fort Prep Checklist before you queue a long session. Avoid the wipe habits catalogued in Common Mistakes.
Trike Titan (badge-confirmed)
Role in the meta: early-to-mid named wall. The official Trike Titan badge confirms this encounter as a real milestone — not just a video title. Full badge context: Badges Guide.
How to approach
- Expect heavier HP than trash dinos — single spike lines may tick too slowly.
- Double your lane DPS: overlap trap damage with at least one turret that never loses line of sight.
- If Trike Titan walks a wide path, shorten the maze. Long scenic routes let it soak traps without enough shots.
- After the kill, immediately repair any wall the boss body clipped.
Common failure: celebrating the badge popup while a leftover pack slips a side door into the egg.
Gravemaw (community-named)
Gravemaw shows up heavily in community boss shorts. The name is community-documented from footage, not a separate official badge on this wiki. Treat it as a pressure + fear fight: players overbuild fancy outer rings and forget the egg core.
How to approach
- Prioritize Egg HP visibility. If the bar dips, abandon expansion and reinforce the final five tiles before the egg.
- Stack slow or high-tick traps on the last corridor so Gravemaw spends more time under turret fire.
- Keep a weapon ready for adds that spawn or trail the boss.
- After Gravemaw, re-check trap HP / placement — boss bodies often desync a tile you thought was safe.
Deep lane theory: Traps and Turrets. Walls theory: Walls and Lanes.
Chompers (community-named)
Chompers fights in community clips read like burst threat — either multi-hit pressure or a chomp pattern that punishes thin walls. Label comes from community footage, same honesty rule as other non-badge bosses.
How to approach
- Prefer redundant walls on the final approach (two layers beats one pretty gate).
- Place traps where Chompers must pause, not on decorative side yards.
- Turrets slightly recessed behind a wall notch can keep firing while the boss chews outer pieces.
- If your fort is a hollow box, add interior baffles so a breach still forces a second trap line.
Layout patterns: Best Fort Builds. Role grades: Walls Tier List.
Titanhorn (community-named)
Titanhorn is framed as a late showcase boss in community shorts (community-named from footage). Expect long HP pools and a need for upgraded economy, not starter spikes alone.
How to approach
- Arrive with upgraded mid-tier traps/turrets already online — do not start a Titanhorn wave with unspent cash and empty lanes.
- Focus fire: every turret should see the same approach tile.
- Use crate weapons to burn the boss while traps handle escort dinos.
- Plan an escape rebuild: after Titanhorn, waves often continue. Leave materials/cash for repairs.
Compare role rankings on the Tier List Hub and Turret Tier List.
Scytheclaw (community-named)
Scytheclaw is a newer community-named boss documented in player footage (including clear videos such as Geckoloverember’s upload). Treat that footage as evidence the encounter exists in live sessions — not as a fabricated official patch note with invented HP percentages, and not as an official badge on the Badges Guide.
How to approach
- Assume Scytheclaw-level pressure needs the same fundamentals as other named bosses, executed cleaner: one sealed lane, double-wall or baffle on the final approach, overlapping turret cones, and a weapon for escorts.
- Do not invent special rebirth mechanics or fake loot tables. Spend verified wave cash on Walls / Traps / Turrets / Weapons that close real holes.
- If Scytheclaw clips outer pieces the way other large bodies do, repair immediately after the kill and walk the perimeter before the next wave.
- Watch the embedded fight for pacing — note when the creator stops building and commits to DPS — then adapt the geometry to your egg facing.
Common failure: treating Scytheclaw like a trash wave because the name is new, then mid-fight shopping while Egg HP collapses.
Boulderback (community-named)
Boulderback appears in community boss shorts (including fight clips titled around the Boulderback encounter). Like Scytheclaw, the name is community-documented from footage — useful for callouts when the HUD or creators use it — not a badge-confirmed label like Trike Titan.
How to approach
- Expect a heavy body that rewards stacked lane DPS more than a long empty maze. Overlap traps with turrets that never lose sight of the approach tile.
- Keep double seals or baffles on the final tiles before the egg; large bosses punish thin single gates.
- Hold a cash buffer for post-fight wall repairs — boulder-sized bodies clip fort pieces the same way other tanks do.
- Fight with a crate weapon on escorts while automated defenses stay locked on the boss silhouette.
- Do not invent Boulderback-only rebirth drops or fake loot tables. Spend wave cash on egg-critical Walls / Traps / Turrets / Weapons.
Common failure: rotating the whole fort mid-fight because the short looked dramatic, opening a side gap while Egg HP collapses.
Additional community boss pacing appears in multi-boss showcase videos; use them as visual references, then verify tactics in your own server.
Boss night checklist
- Side paths closed (Walls and Lanes)
- Primary funnel DPS upgraded
- Weapon equipped from crates (Crates and Weapons)
- Cash buffer reserved (How to Earn Cash)
- Egg HP visible on HUD
- No mid-fight construction
- Post-boss leak walk completed
- Mentally ready for Trike Titan (badge), Gravemaw, Chompers, Titanhorn, Scytheclaw, or Boulderback
After a wipe
Note which boss and which tile failed. Rebuild that tile first next run. Check Updates and the Changelog Tracker after patches — boss HP and spawn order can move even when shop names stay familiar. Official group socials sometimes surface boss clips first; join safely via Big Chomp Games group without trusting random Discord invite pastes.
Related reading
- Badges Guide — Compy Tamer and Trike Titan
- Getting Started
- How to Defend the Egg
- How to Earn Cash
- Best Fort Builds
- Common Mistakes
- Walls and Lanes
- Players Hub for six-player server etiquette during loud boss waves
Protect the egg at all costs — bosses from Trike Titan through Scytheclaw and Boulderback are louder reminders of that rule.
Frequently Asked Questions
Quick answers to the most common questions.
What bosses are in Build a Dino Defense?
Trike Titan is badge-confirmed. Gravemaw, Chompers, Titanhorn, Scytheclaw, and Boulderback are community-named from footage. New names can appear after updates — verify in the live HUD.
What is Scytheclaw?
Scytheclaw is a community-documented boss seen in player footage. Prepare like other named fights: sealed lane, stacked DPS, cash buffer, and no mid-boss building.
What is Boulderback?
Boulderback is a community-named boss from fight shorts. Use the same fundamentals as other tanks: one choke, overlapping DPS, repair clipped walls, and no mid-fight shopping.
How do I beat Trike Titan?
Seal side paths, stack traps and turrets on one funnel, keep a weapon for adds, and repair clipped walls before the next wave. Earning the kill also grants the Trike Titan badge.
Should I rebuild during a boss fight?
Only if Egg HP is seconds from death and a gap is obvious. Otherwise finish the fight, then rebuild calmly between waves.
Do bosses drop special loot?
Treat cash and crate progress as the reliable rewards. Exact drop tables can change — spend income on egg-critical defenses first. Do not invent rebirth rewards.
Where should I watch boss fights?
Use the embedded Scytheclaw community video on this page, community Boulderback shorts for that encounter, and cross-check tactics with the egg-defense, badges, and traps guides.